joi, 30 decembrie 2010

Happy New Year !


the painting has nothing to do with paper mache but it is responsable for the delays regarding the pm works
,though i'm sure i will neeed that experience when finishing my paper stuffs.i like both colorful and texturized versions...
see what's next on my table and the first little painting (20cm/20cm)on canvas....(if you want to see more pictures with the painting click here)


have a great day and a terrific New Year !!!


luni, 27 decembrie 2010

happy days...

they really are...what a wonderful Christmas we had and the following days...
i even had time to make a little box for three of the "leaving"snowmens.three of them remain at home as my son wanted,they looks just great on the xmas tree and three of them be soon on it's way to Timisoara.

the box,not quite for snowmens (it looks too hot i know) but this is how it came out.i tryed something else first but i messed up the painting ...so then i just freed my mind and let it come whatever it has too.below you can see what i recycled...


see you next time,untill...please serve yourself :)


sâmbătă, 18 decembrie 2010

for you all !


my happy bunch of christmas tree snowmen ornaments were finsihed yesterday and they stand up prefectly for a wish that comes from our hearts-have a wonderful ,magical Christmas time dear friends,followers,visitors !!! i'm not a wizard of words so i just telling you.... all the bests !!!

Sarbatori Fericite !!!-un Craciun minunat ,alaturi de cei dragi ,iubire,pace,speranta unei lumi mai bune!!!

Istentol megaldott Kellemes Karacsonyi Unnepeket !!!


they looked like this before ..paper mache is magical isnt' it ?....see you ;)

joi, 16 decembrie 2010

don't make my mistake


here i'm working on a new bowl using the same type pulp as seen on the mirror but this time" the rush " partially ruined the bowl. though i knew the time i was making it that it is risking i was curious to see how long thin strips are working.i pressed them well into the form but was greedy and added to much at a time.the result...you know...the inside is perfect,no problem with the edges but the exterior (see the pencil marked areas) has to be rebuild.it it soft because of the cavitys.i added a few strips of brown paper over the week parts (like a lazy gal hiding the garbage under the carpet )but didn't solved the problem so i better remake that....


see you next time !

luni, 13 decembrie 2010

old doodle-new object

hi friends!

i can't remember when i made this tiny little doodle on my notebook but i can tell you that i begined to work on it early in the summer.
i cuted out an aproximate circle form (50 cm diameter) of cardboard,glued a "naked"mirror on than added the pulp all around the it .as you can see i did not used a blender for the pulp.it is only striped paper,flour paste and water.i coated the cardbord with diluted pva as i learnt from Jonty than added the strange pulp and left it to dry flat.
for some reason this summer were a nasty one,we have not seen to much the sun but rain.the mirror dried very slowly and even began to mould.so when somehow dried i put it aside for better days...and they have come.the radiators are going well and the stuffs are drying much quicklier.
what i have done now was another layer of the same type pulp and wait to drie.than i sanded it a little bit with hands and my husband helped with the sanpaper attached drilling machine.it doesn't came out as smooth as i wanted but i knew that the painting will full the eye.of course this made harder the painting job.


it will be a Christmas gift and i'm very happy that i could finish it in time.i may still add a star or a little bird here there but i'm not stressed...i used for the first time acrylics insted of fluid pigments and i was so happy that the headaches caused by smudging dissapeared.
i also learned that using acrylics the work can be called done sealer is not that important like before.of course i am thinking of sealing it,shinny varnish or not doesn't matters in this case....

miercuri, 8 decembrie 2010

zsuzsika

she is gessoed ,now it comes my favorite part-the painting !!!
and there she is........my first doll................

yesterday i finished her...
well this is how our traditional suit looks a bit stylized though(the dress in original is longer and not so round.the models on dress and vest are different depending on the aera from which they comes-anyway the red color and wolf teeths on the vests are omnipresent,while the apron is not ) the tenis shoes are my contribution lol,they usually wear long black boots or lacquer shoes but i couldn't resist....
i don't know how to make the final touch-varnish it or just coat it with a diluted pva glue...i would go for the varnish but all my varnishes shines too much.
...........i love the way she hangs,hehe...............

sâmbătă, 4 decembrie 2010

i'm back

this new impuls to restart mache-ing happened about 10 day ago when my husband wanted to throw away a bag full of fax paper.quickly made 5 circles having in mind christmas .the ornaments are still not ready BUT at least i scoured all my "treasure"boxes and even started a few new things like my very fist paper doll.my hand are again soaked in flour paste and it feels sooo good.my residence has not changed,the kitchen,lol and i use the same flour to cook,the same big working table and everybody is happy :).yes,winter is good for paper mache...
so here i'm showing you a few shots of the doll which slowly takes shape and i can't wait for the painting part.hopefully soon it will be ready...


the cup was the original idea but as you can see some legs has increased inside
and changed the direction...

the legs were removed and reshaped...


she even got a handkerchief and ribbon...
now,almost ready,i hope in a day or two she will shine in her traditional suit i also worn as a child...
have a great weekend !

sâmbătă, 29 mai 2010

recently finished old cup

while still recovering form a bad could witch ended up with a nice pneumonia i "finally"
managed to finish and old wip(well still got to varnish it,but i already call it finished...i can't wait).

pour thing had its leg broken and it had a few more weak points but i did not rushed
and resolved them slowly as time and mood let me...

i don't have "how to build "pictures but i tell you i made it over the same type of milk jug i use for this kind of cups (called "MILLI"milk) using both methods -strips and pulp-and i love that shape that can easily become something else for ex.a princess dress if turned upside down lol...

when i reached the painting part i thought i may use one of my pattern sketches over it (see the blue paint version) but it was not only v difficult but also not v effective so i let it go and made something" lighter" using paper coils (not a bit of clay i swear! that medium is making me with the eye from a long time but i'm a stubborn head and have this silly ambition of "pure"paper...well at least regarding this cup lol).
i made the coils with the same method i wrote about a few posts ago..
.


this is the final product,i don't know what's coming
next i could make a nice mosaic of unfinished stuffs waiting in different places...


luni, 10 mai 2010

plasticine and mold

i made the plasticine faces about a month ago as i could not focus on anything larger or time consuming but some little oil clay sculptings.it was fun making them and i just loved the way they fitted the situations when everything were (and it is) much important than relaxing through creation.
oil clay is generous.not only with kids ...i could always restart,drop it,restart and so on.the sharp silicon ended sculpt tool i bought half year ago for making paint dots (hehe) were exactly what i needed though i had no idea at the time that actually that is a wide used tool for sculpting in any kind of clays.

the brown face is already smashed or should i say generously turned out but the rest is still what they were a month ago...i mean nothing but faced bits of clay.

as you can see the following two pieces were luckily casted i just have to dare to compact a little paper pulp into ....or better to paste some strips as the mold came out a little bit deep.i would like to keep the mold if possible.
the basic idea would be making a few finger puppets and/or frig magnets so i'm really curious how they'll turn out.it must be a way out isn't it?


duminică, 9 mai 2010

gun matter

just a short post of last days acquisition.a very much expected tool since a red about it's usefulness long time enough to think this could resolve the gluing problems i met along the way.my husband helped me choosing the best type regarding his experiences and i must say i'm way too happy my fingers won't stick any more to my unfinished wips.you know...


so here is the first thing i glued with it...a paper clay ornament to my next paper bracelet.


coming next my very OLD birdies leg.....

that sad i wish every mother a happy Mother's Day!!!

sâmbătă, 27 martie 2010

carnival costume

we found out quite late about my sons kindergarten carnival and also took a week to realise that it is much closer then we think while we were wondering what kind of personage he may like to be.

i started a mask while ago (you know the build up part with children use oil clay over a plastic batman mask lol which i found in a chineze shop-or better said a shop full with chineze stuffs-and sadly this is a tendency around here shops overloaded with cheap chineze materials,toys,cloth available to the large mass of tight belt population in crisis) and i thought to work out a wizard or witch mask until we decide what his costume is going to be.

we asked him what he wants to be and he sad calmly that a rocket would do it.my husband liked the idea v much and thought it was not to difficult making it already having the a lot of needed materials plus my mache experience of glue making,stripping,paper etc...lol

i was anxious because time was slipping through our finger still not a step made . i was ringing silent bells that we should start it because drying is a time consuming thing.
finally we faced the fact of having 4 and half days for making the rocket costume.

the costumes armature weren't the best actually was v weak (i told him lol) and i made only two paper layers over the cardboard(soft one) which warped as i thought at the first coat of acrylic wall paint.anyway we continued and done it after all.even if it's having its weaknesses here and there made his job successfully.our son collected a lot of wows when he entered the room.he was very proud of his original costume and even if it's stiffness prevented him to be too quick (as he usually is lol) our efforts were well paid by his contented smile.


forgot.the next carnival he wants to be a submarine looool

marți, 23 martie 2010

i won

my creation line is still beeping well not with a "normal" pulse but it's still alive lol...
there's been more than a month from my last post though i would have had a few stories to tell...
a sad news kept me away from my artistic activities and made me focus more on the family line..not that i'm "away" too far from it in my every days.a ray of hope was all i needed than and it came.i hope it stays that way!

meanwhile i had a pleasant surprise by being the favoured winner of a recycled jewellery contest on flickr which ended up looong time ago.i entered the contest with one of my paper bracelet made of empty masking tape inner and recycled newspaper pulp.

the contest organizer is a young open minded guy who lives in Hungary and has his very unique and original line of jewellery,belts, dog leads made of bike tires,valves of tires and inner tubes.
his wearable art runs under the slogan "once a bike-always a work of art" as i saw it in guardian.co.uk .he has a new site you may take a look...http://1mind1.com or access his flickr account via http://www.flickr.com/photos/mind1/ .
these are the earrings that i won and i'm happily wearing them! thank you again Denes!!! you've made my day in that cold february day.


now the picture of the winning bracelet made as a christmas gift to is "dio"bracelet.


i hope soon to post some of my aged projects which are still in progress faze and some of the new ones as a mask and a rocket costume for my sons kindergarten carnival lol.

luni, 1 februarie 2010

study on coils

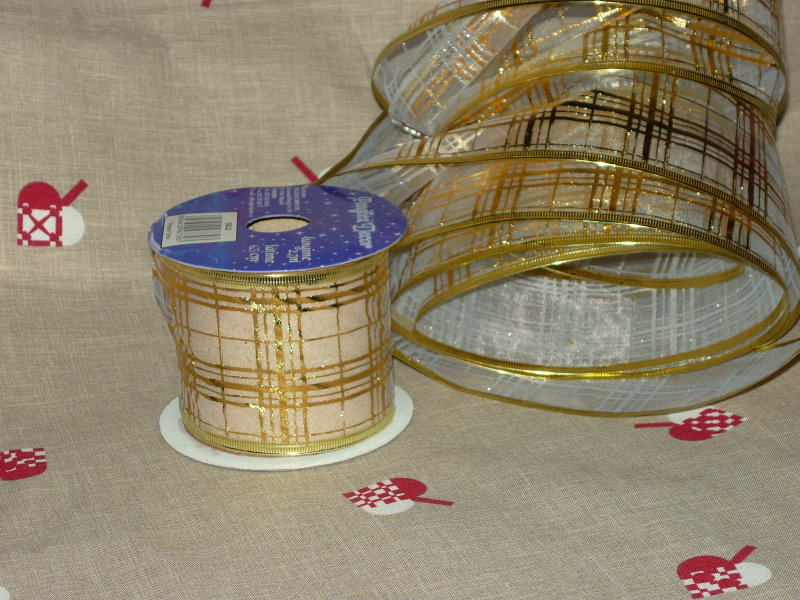
it was in my mind to try coiling some paper while ago and now the moment become actual.i found many artist using coils to decorate their stuffs mostly the edges of their works and i could have been able to show a link to them if i wouldn't be so skilled to erase my favorite paper artists link while ago when i added another item.now i have to find them again and it will be not be easy.i'm not very sure if they used just the paper and flour mixture i usually do or if it was the so called fast mache or better said paper clay.i never worked with paper clay but i found out that it is a mixture which allows you to sculpt very fine details .coil is a detail i was willing to know more about.i remember very vague a sheep maybe sawn on etsy with a superb coiled fur.
i sad i should give it a try using my knowledge about corn shuck coils. this is a tradition in my grandmothers village where almost everybody makes objects from it .the coils are all the time needed and put over a wooden frame and some nails.the wide shuck end is cut because it is too rough then soaked in water for a minute or so and kept wet while working with them.i was doing it also with pleasure when i was a child and spent my vacations at my grandparents.of course the shucks advantage is that it won't tear apart like paper does if too wet or too soft.
the coils i made are recycled gifts paper but it will work well with shiny magazine pages too.i tried to imitate the shuck coils which with a little practice of course came uniform and round and thanks to their V shapes makes easy the continuity.that will be another study later on hehe.what i found important here is that after i twisted the paper i covered it with narrow strips of toilet paper,kind of v rough.we can still find it some place.it looks v much like crepe paper lol.i just put it over the coils dry they will soak enough humidity when it came twisted again.that would smooth out the coils and gives the look i want. hope it is understandable.a video would be word saving and easier to understand but no time for that.

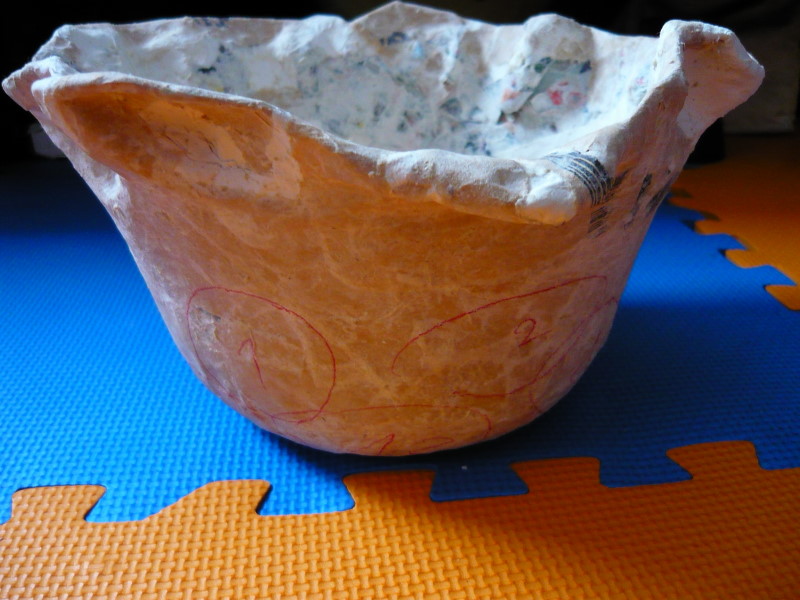
what i did here was to recycle about 8 egg holder,actually the upper side ,the lid of the egg holder.i soaked in hot water for about 2 hours then teared it and pasted over a balloon with flour paste.this is what i call fast mache,you don't have to deal with the pulp.it is already ready.two layers of this "pulp"is enough for a bowl project specially if it cames hardened with the dragon skin. the coils came as an ornament i dreamed one morning lol but if you could take a look outside our window you would see the same pattern made from iron lol.i just figured out this yesterday.but inspiration come from many places....though mostly form the kitchen lol.i take a lot of shots while cooking not artistic photos but of anything that grabs my attention.like an onion for ex.my next painting idea lol.i must see to can paint.
enough for words huh,here some pictures


i used for the first time modeling paste.i asked for white acrylic ink and received this.my husband sad it is better this than nothing.lol.it is a lightweight paste which covered very well the wholes between the coils and body of the bowl but a bit expensive as art supplies are usually.ehe


this is the final result and i got some very good advices to enhance the texture from Magdalena and Marilyn my flickr friends.thank you!i will sure try both methods!
Magda " I would slightly enhance the texture: dip a sponge in diluted black/dark blue acrylics and just touch the outer texture. It will give it more dimension. If you make it too dark - you can just wash it out by rubbing with damp sponge/cloth :) "
Marilyn "If you'd like to "enhance the texture", as studiomurano suggested, maybe you could rub a soft lead pencil onto paper, then get some of the lead onto your fingertips and rub it onto the high spots of your bowl. You could also use pastels or conte, maybe charcoal or even soot from a stove; anything that gives you the look you want. "
please don't mind the quotes i rush to the end...my baby has to wake up.thank you again!

vineri, 15 ianuarie 2010

new bracelet


i'll write the text later..........i have to ruuuuuuuuuuun

hi.back.not for long though hehe...
if anyone would like to know how this bracelet was made than read the comments and you'll find out.this time i did not used any inner just a piece of flexible cardboard.

joi, 7 ianuarie 2010

study

the latest three little bowls.. cannot call experiment..better a study of textures... this one following the orange-brown bracelets texture in a lighter hue.same procedure showed below -see first

bowl-


i will change the pictures as soon as i find them for a better view...for now i borrowed them from my flickr.


yes.you guessed.i used my husbands wood burner and i liked the bubbled texture a lot.
made from a very rough pulp-i call it one minute pulp-dragon skin-then pure pva burned at once i did not wait to dry... those tiny little bubbles were then painted with acrylics and are not sealed yet.(they are all over in the inside of the bowl and just portions on its outside)
here a picture before the finish....


the third following the bubbles line...i may change it...this is for now

inside and out...not varnished yet

LinkWithin

Related Posts with Thumbnails